27 Kitchen Halloween Decor Ideas
This site contains affiliate links. We may earn a small commission, at no extra cost to you. Article may contain some images for illustrative purposes only .
The pumpkin sitting on my counter has a bite taken out of it. Not by a mouse—by a ceramic ghost with a very smug expression. He’s part of a new tablescape I’m building, and honestly, he’s stealing the show. Halloween in the kitchen hits differently than Halloween anywhere else in the house. It’s where the caramel apples get dipped, where the witch’s brew punch gets ladled, where guests inevitably end up leaning against the island at 10 p.m. So the decor has to earn its keep. Ahead: 27 ideas that go beyond a lonely jack-o’-lantern, from blood-splattered dish towels and skeleton spice racks to elegant black taper candles, apothecary jar pantries, and a chandelier situation involving bats. Some are spooky. Some are subtle. All of them will make your kitchen the best-dressed room this October.
Pumpkin Teapot as Centerpiece
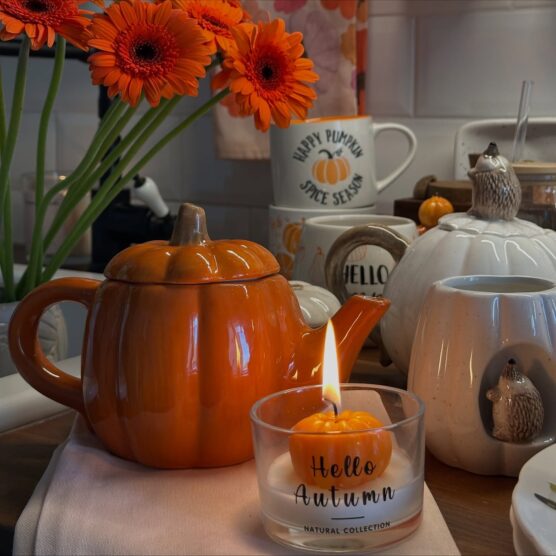
A ceramic pumpkin teapot pulls more weight than a regular decorative gourd because it’s actually useful — you can brew in it, or just leave it out. Group it with things that echo the shape: that small “Hello Autumn” tealight candle in the image is a pumpkin too, and sitting right in front of the teapot, it creates a little cluster that reads as deliberate rather than random. Orange gerbera daisies in the background do a lot without trying.
If you can’t find the exact teapot, a plain orange or cream one works — just add a small pumpkin stem charm or ribbon around the handle. The mugs behind it, including the “Happy Pumpkin Spice Season” one, show that repeating the theme across functional pieces keeps it from feeling like a display shelf.
Window Cat Cutout
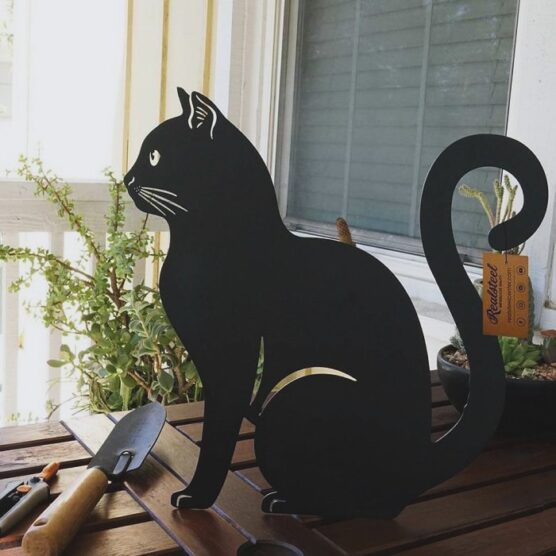
Set the cat cutout where the daylight hits it from behind, preferably on a kitchen windowsill, open shelf, or the end of a counter near a plant. The shape does the work. That curled tail reads Halloween without adding pumpkins to every corner, and a small plant tag beside it makes the whole thing feel like it belongs there.
Use cardboard, foam board, or thin plywood painted flat black; anything shiny will catch odd reflections from the window. Skip glitter here. It will just make the cat look more like a party-store prop than a small shadow sitting in the kitchen.
Ceramic Cookie Jars With Character
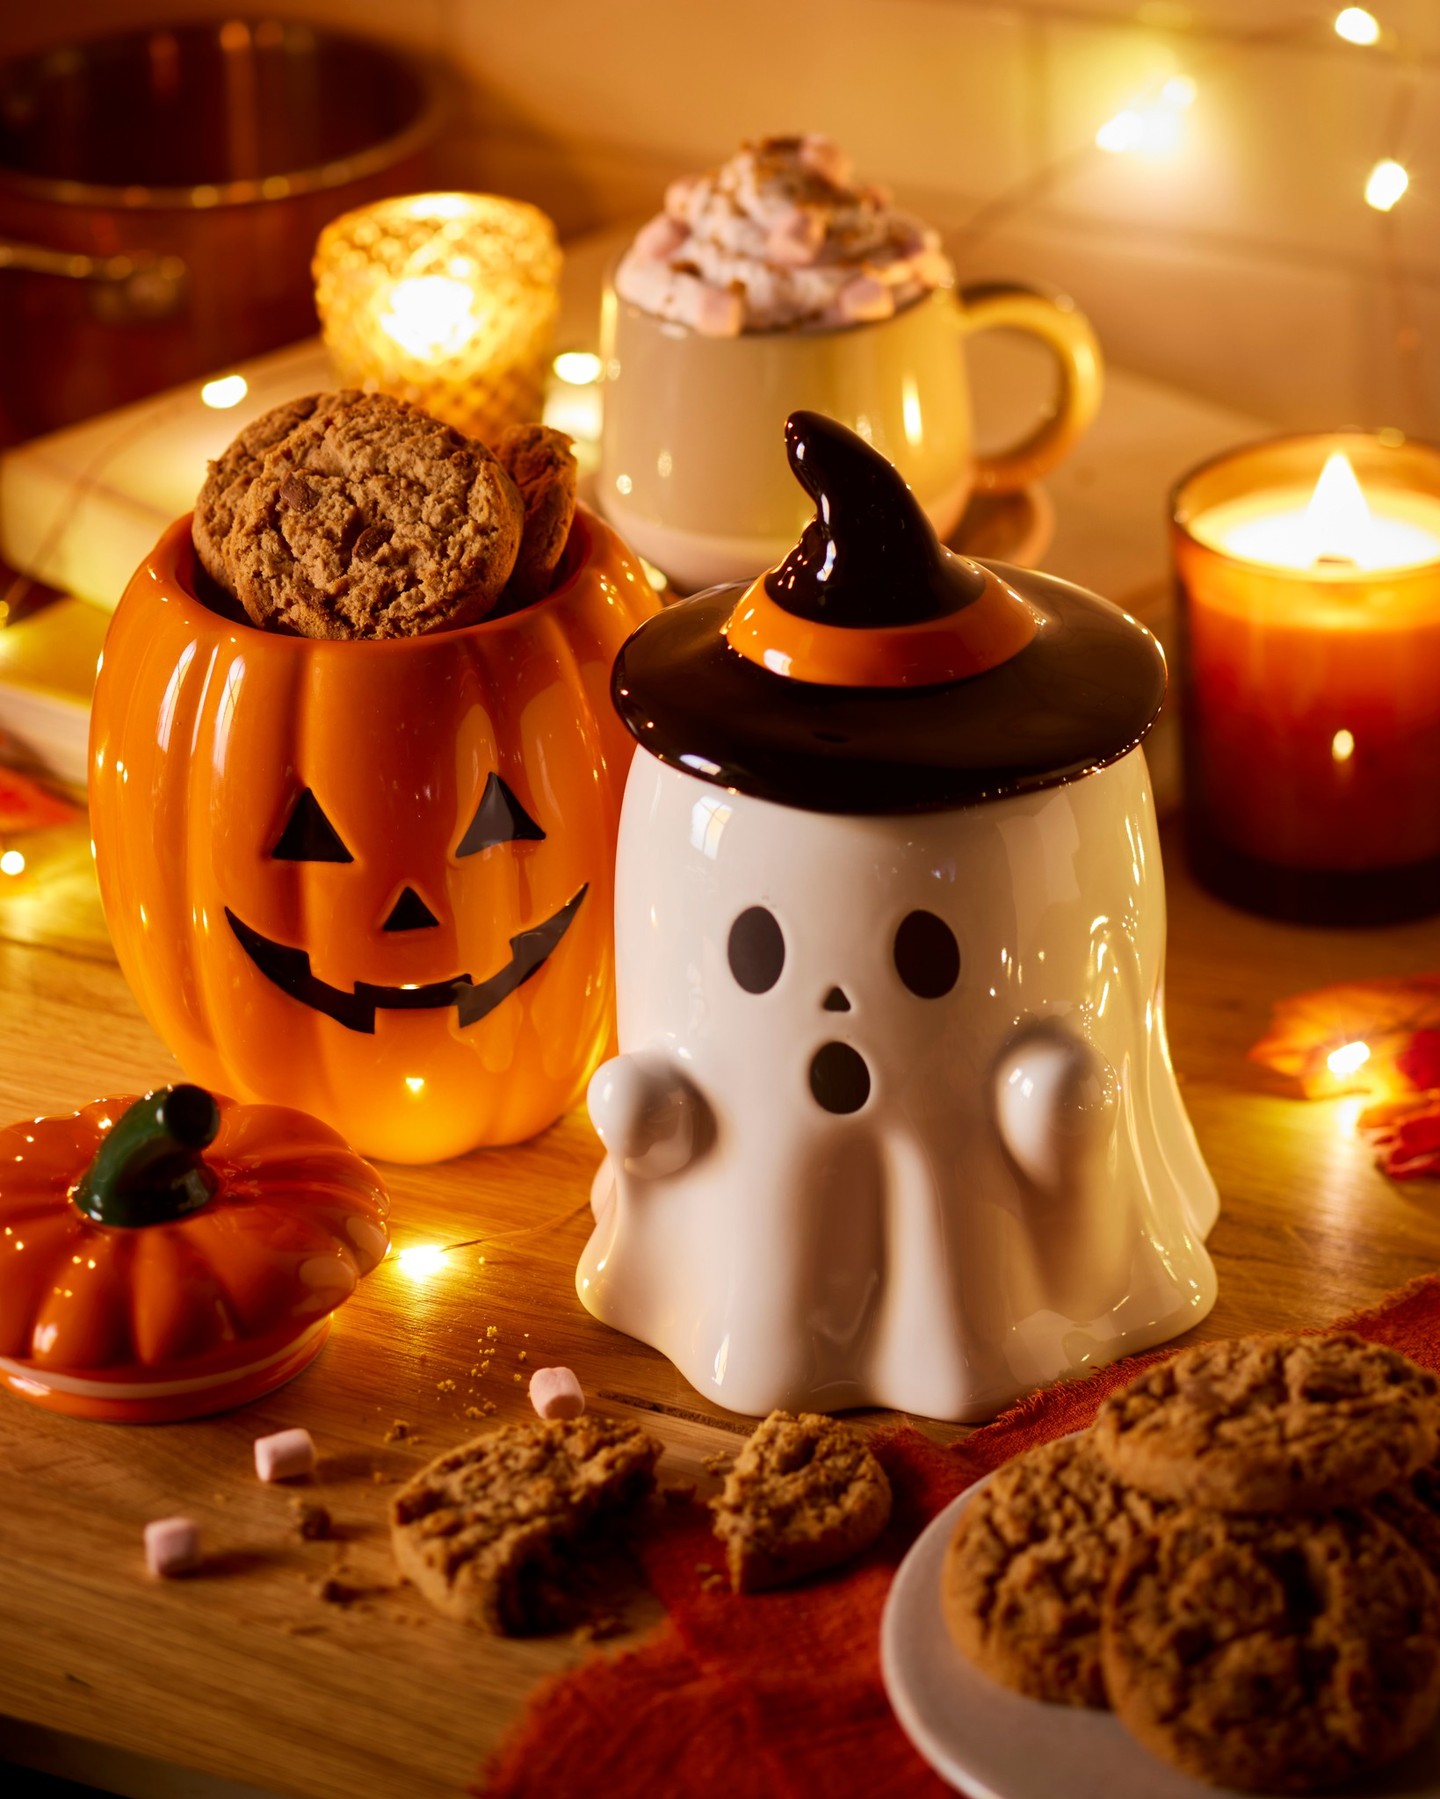
The pumpkin jar and the little ghost with his witch hat lid are doing the heavy lifting here. Both are practical. A ceramic jar keeps cookies fresh on the counter for a week or so, and once October ends you can move them to a shelf and still use them for biscuits or tea bags year-round.
If you’re buying just one, I’d go with the ghost. The pumpkin reads very Halloween and nothing else, but a white ghost with a dark hat looks fine sitting out into November next to a mug of cocoa. Fill them with actual cookies, not the plastic prop kind. The whole point falls apart if a guest lifts the lid and finds nothing.
Tray display centerpiece
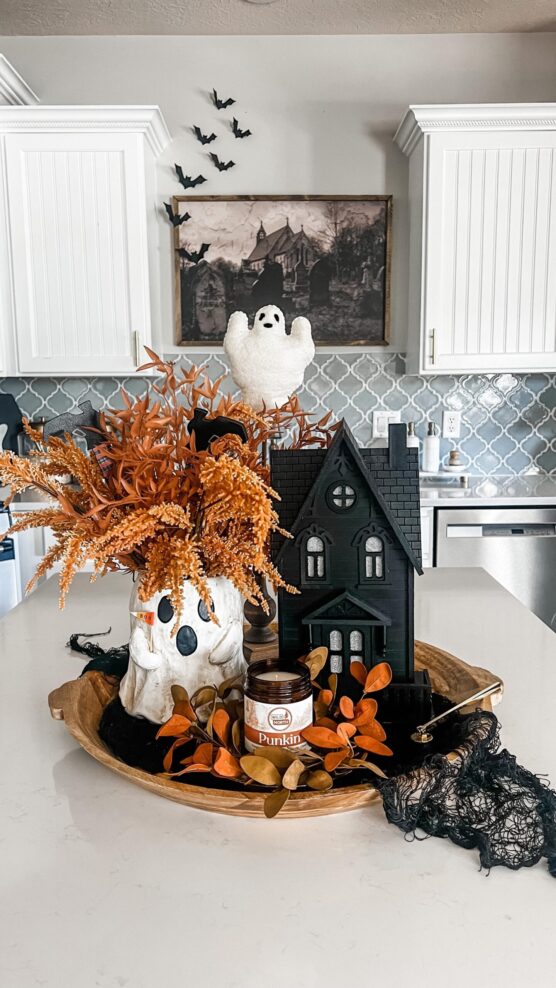
Start with a wood tray. Keeping the whole setup inside one round base is what stops a Halloween centerpiece like this from spreading across the entire island and looking like a pile of random seasonal bits.
Use two main anchors only: a black haunted house and one ghost vase stuffed with rust-orange stems. That height contrast does most of the work, and the candle in front fills the gap without blocking either piece when you’re walking around the kitchen. Add a few loose orange leaves and a small piece of black gauze, then stop there.
The black house matters. Against white counters and cabinets, it reads from across the room and keeps the orange from turning too harvest-only.
I’d skip anything glittery here. The matte black and the crinkled white ghost shape already have enough texture, and more shine would push it into party-store territory.
Apothecary Shelf in the Kitchen
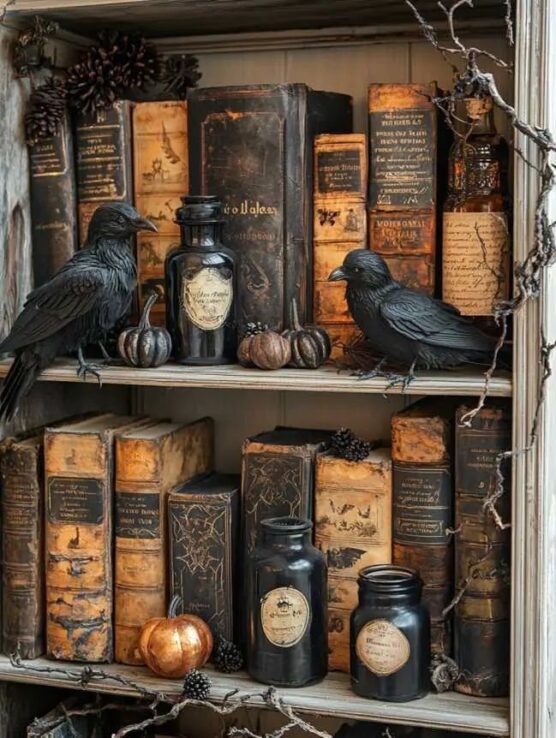
Spare shelving near the stove or a open cabinet works well for this. Grab a few old-looking hardcover books — thrift stores usually have brown or black ones with worn spines — and stack them upright with small matte black jars tucked in between. The labels on the jars in this image are what sell the whole thing, handwritten or printed with names like “nightshade extract” or just old cursive text.
Mini pumpkins fill the gaps without taking up much room. Honestly, the crow figurines are optional. They photograph well but in a real kitchen they collect grease and dust fast.
Dried pine cones and a few bare twigs threaded along the shelf edges do the same job and are easier to wipe down.
Leaf Garland Window
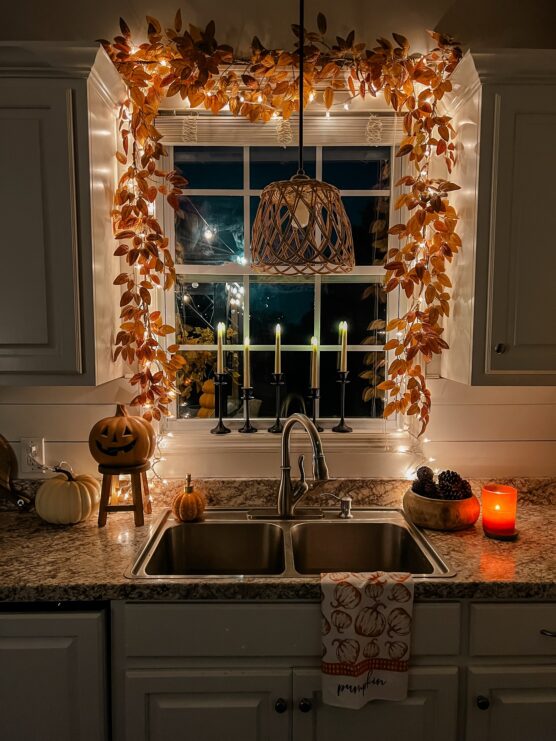
Around the window frame, run a faux fall leaf garland first, then tuck a thin wire light strand through it so the bulbs sit behind the leaves instead of in front. That keeps the glare down. Use clear hooks on the side trim and one or two across the top, because tape usually gives up once steam from the sink hits it.
The black taper holders on the sill push the whole setup toward Halloween. Keep them skinny. If you cook at this sink a lot, I would use battery tapers and skip the real flame near blinds, cords, and dry fabric leaves.
Add one jack-o-lantern or small pumpkin on the counter, but don’t crowd the faucet.
A Chalkboard Cafe Sign
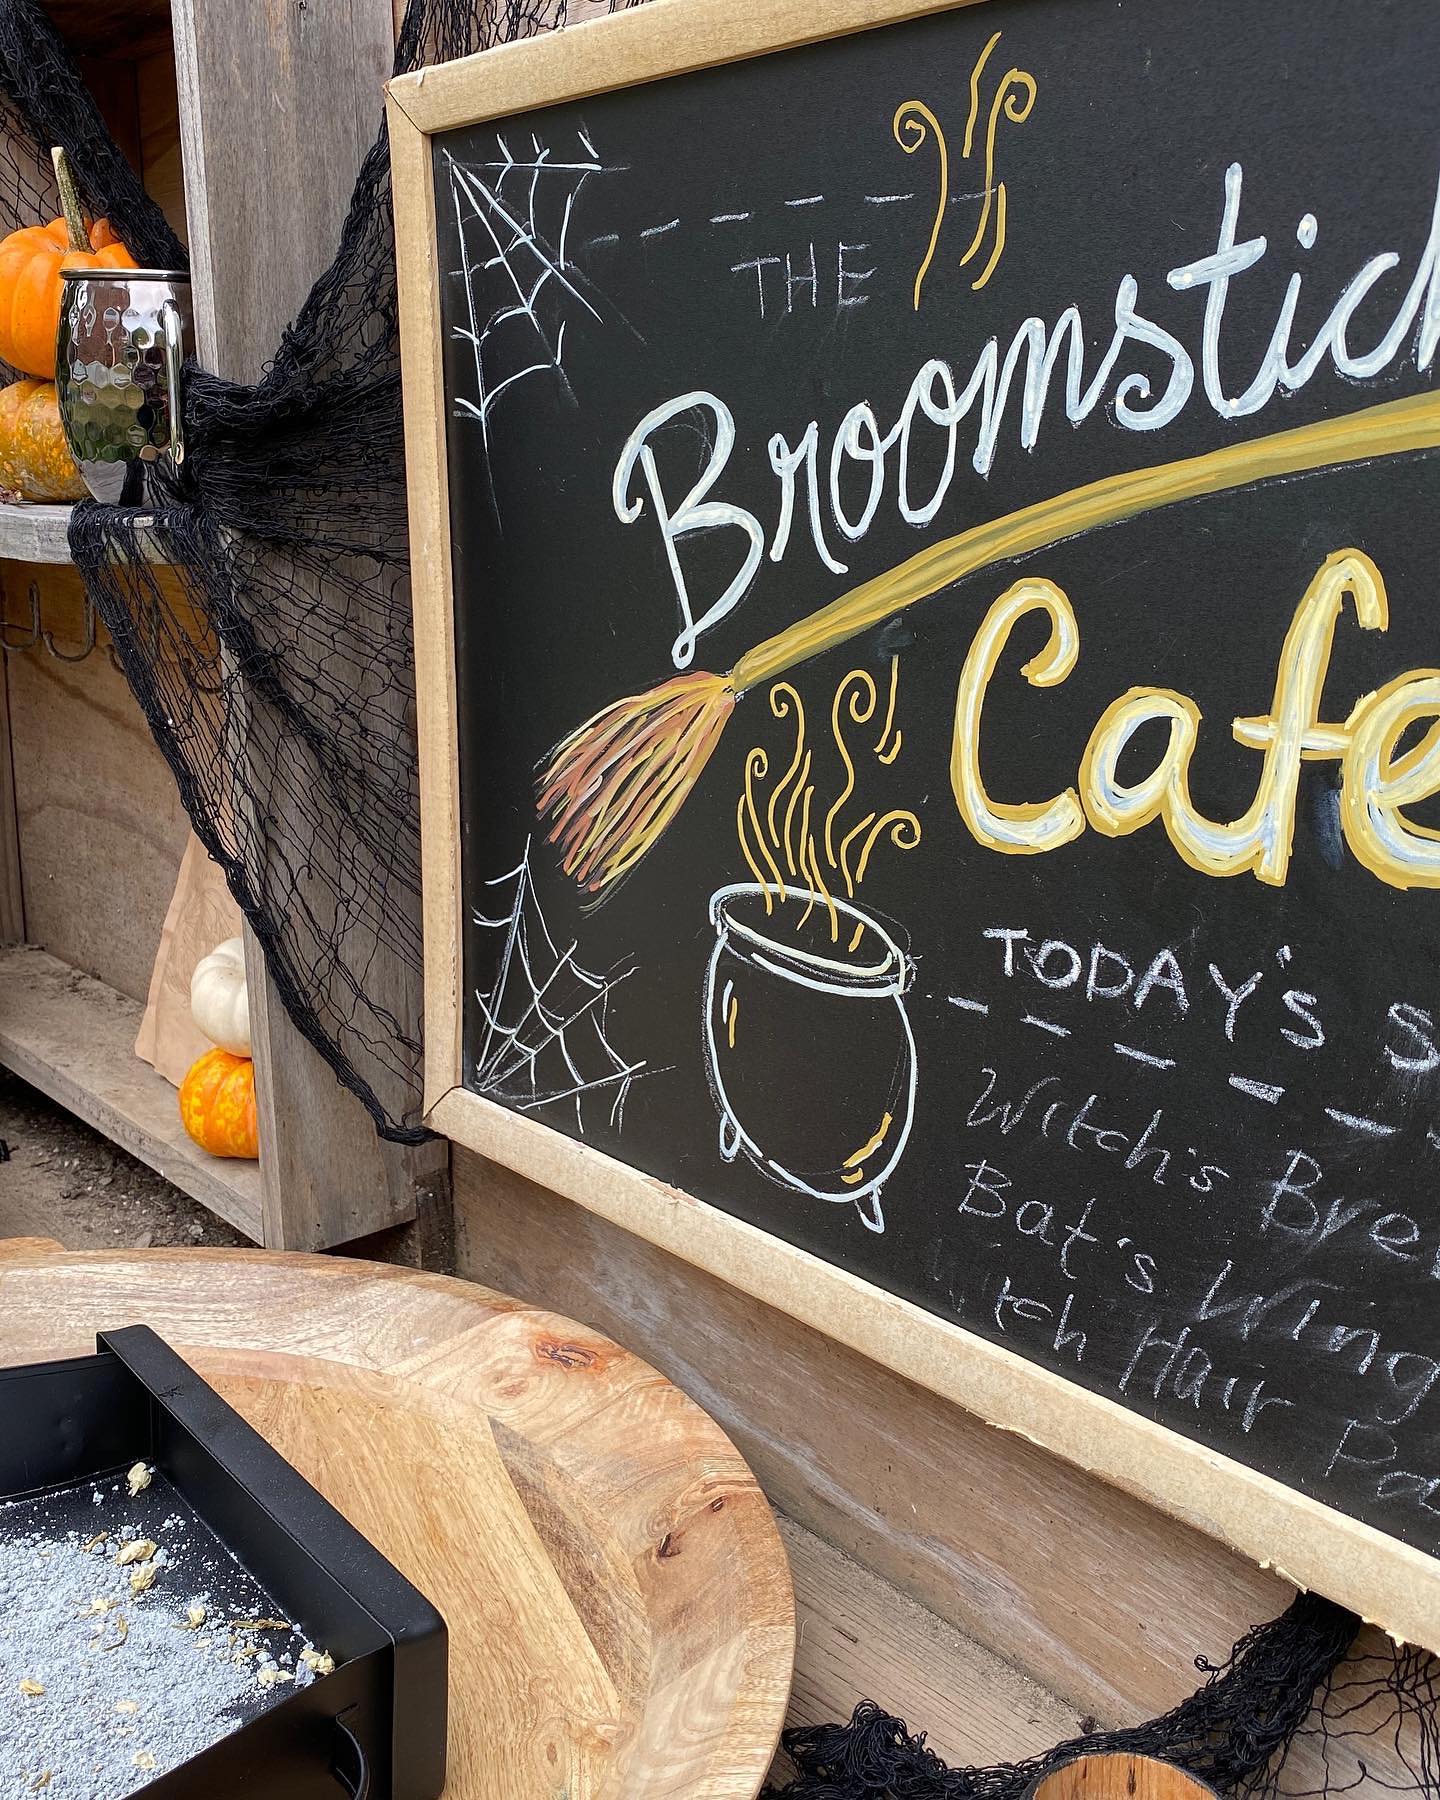
A chalkboard menu turns your kitchen counter into a pretend cafe. The one here reads “The Broomstick Cafe” with a witch’s broom, a steaming cauldron, and a list of specials — Witch’s Brew, Bat Wings, Witch Hair Pasta. That’s the trick. Give it a name, then rewrite your actual dinner as spell ingredients.
Prop it against the backsplash or lean it on a shelf next to small pumpkins and a bit of black gauze. If you can’t draw, trace the letters in pencil first, then go over them in chalk marker so they don’t smudge every time someone brushes past.
Chalk marker over regular chalk, always. Regular chalk on a vertical board looks great for about an hour and then it’s a mess on your counter.
Line the cabinets
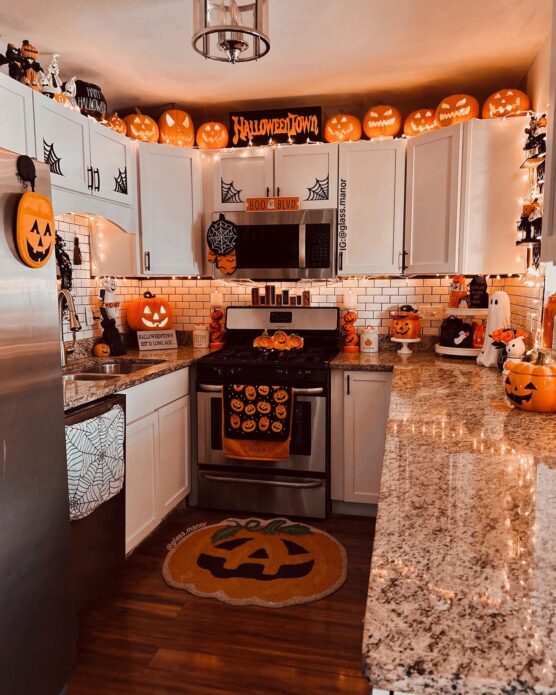
Run your Halloween decor up at cabinet-top level instead of crowding the counters. A row of light-up jack-o’-lanterns works because it uses that empty strip near the ceiling, then the orange glow drops down onto the white cabinets and tile so the whole kitchen picks it up. Very little counter space lost.
Keep the pumpkins close in size so it reads as one line, then let a few smaller pieces break off lower down, like the spiderweb decals near the microwave or one ghost by the coffee corner. That part matters. If everything sits up high, it starts looking a bit like storage.
String lights help. Tuck them behind the pumpkins, not in front, so you see the faces first. If your cabinets don’t reach the ceiling, this idea suits you even more. I’d skip too many character signs though; one bold sign is enough once the pumpkin row is doing the heavy lifting.
Halloween Oven Mitts That Actually Work
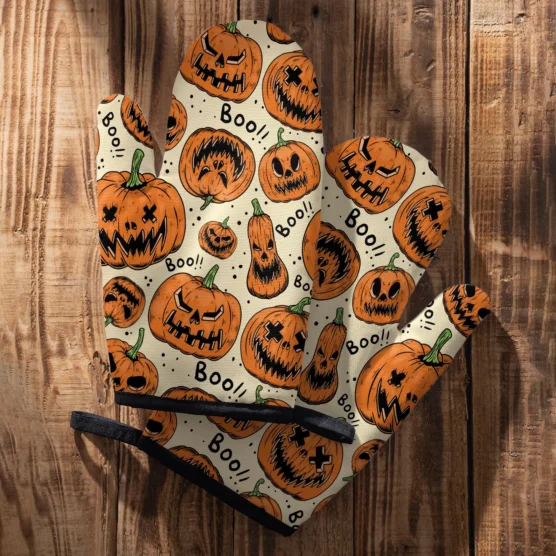
Swap your regular oven mitts out from October 1st and don’t look back. These ones have jack-o’-lanterns printed all over — different faces, different expressions, some with X eyes, some with jagged mouths — and the “Boo!!” text scattered between them keeps it from looking too flat. The dark edging along the cuff pulls it together.
What makes this work in a kitchen is that it’s functional decor, meaning it’s out on the counter or hanging near the stove where people actually see it. I’d probably skip the matching dish towel set if one’s being sold alongside it — the mitts alone are enough. Good pick for anyone who wants Halloween in the kitchen without committing to anything permanent.
Spice Jar Counter Tray
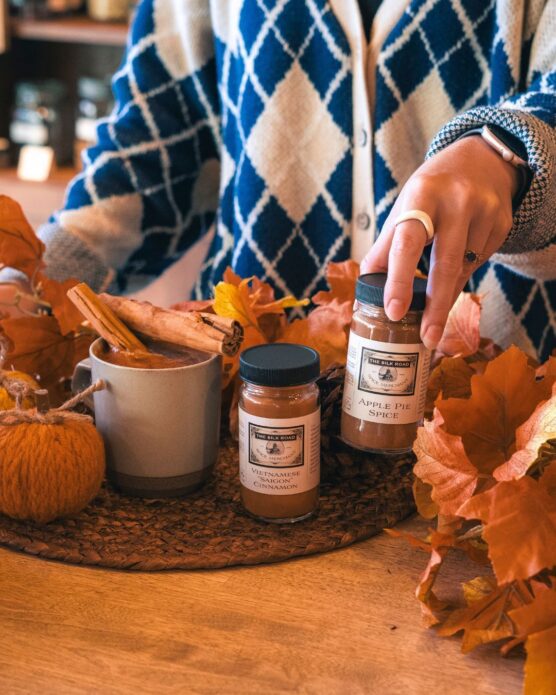
Around the coffee corner, gather the things you already reach for in October. Set the apple pie spice and cinnamon on a woven tray with a mug of cinnamon sticks, then tuck faux maple leaves around the jars so the setup looks planned without blocking the counter. Keep it low.
A tiny pumpkin at the edge gives it that Halloween note without going into plastic bats and fake cobwebs. This suits a kitchen where people actually make tea, coffee, oats, or cider, because the decor is still useful. I’d skip loose leaves near the stove, though; they get dusty fast and start looking tired after a week.
Vintage Jars With Cream Objects
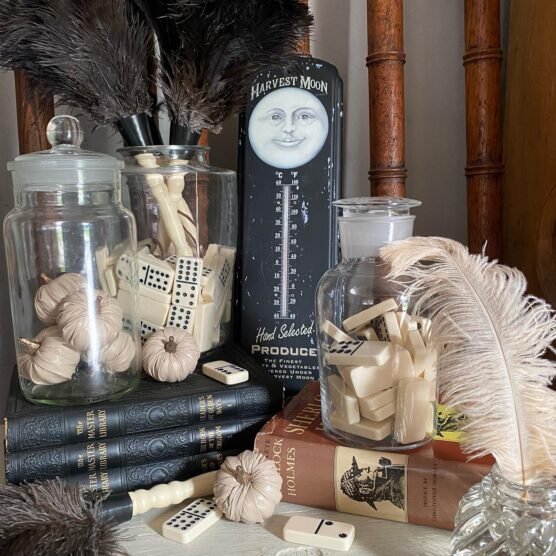
The trick here is sticking to one palette. Cream dominoes, bone-colored mini pumpkins, ivory ostrich feathers — everything in the glass jars reads as the same tonal family, which keeps it from looking like a junk drawer. Stack them on old hardback books for height. That Harvest Moon thermometer in the back does a lot of work as the anchor piece.
If you don’t have vintage dominoes, dried corn kernels or pale wax candles work. I’d skip the black feathers though. They’re a bit funeral-parlor for kitchen counters, especially near food prep. Swap in dried wheat or wispy pampas instead.
Apothecary jars from a thrift store cost almost nothing. Fill them slowly, over a few Halloweens, and you end up with a collection instead of a shopping haul.
Banner over the stove
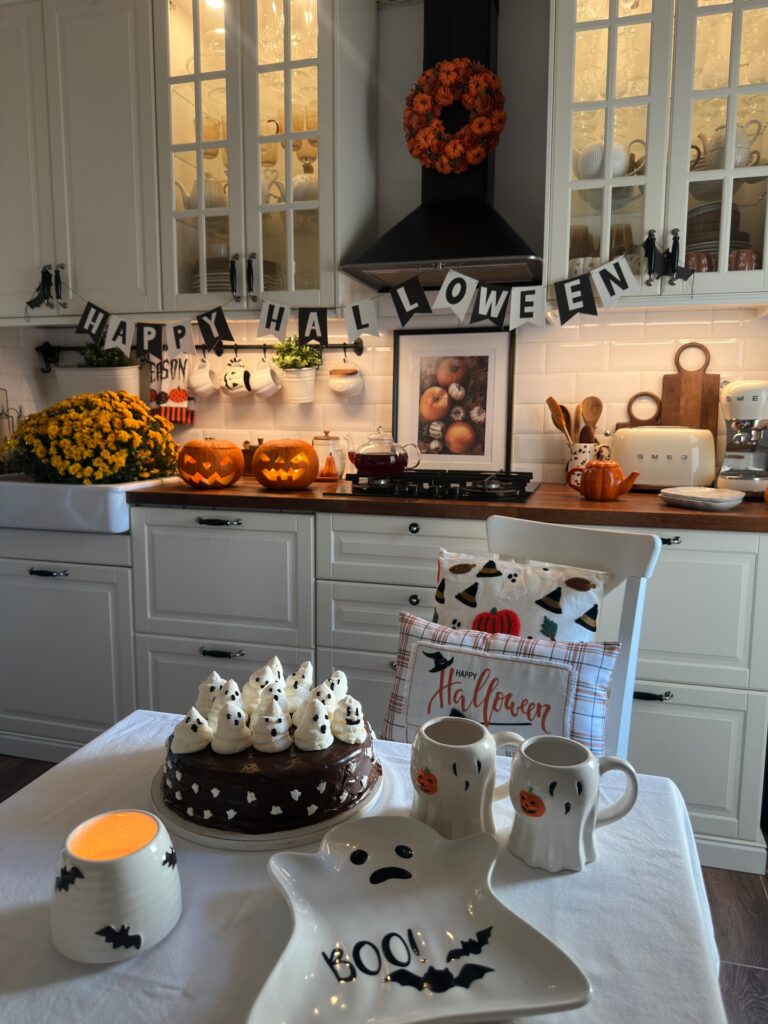
Drape the Halloween banner right across the hood and upper cabinets instead of trying to fill every wall. It works because the letters pull your eye through the middle of the kitchen, and the black shapes tie in with the dark hood and cabinet handles without needing much else around them. Keep the rest low and useful: two carved pumpkins on the counter, a wreath above, maybe one mug rail with ghost cups if you already have it.
That balance matters.
If your kitchen is smaller, skip the wreath and just let the banner do the work, because too much height in one spot can start to look crowded fast. I like this setup for people who decorate seasonally but still cook every day, since nothing here really steals the counter.
Ghost Mugs as Utensil Holders
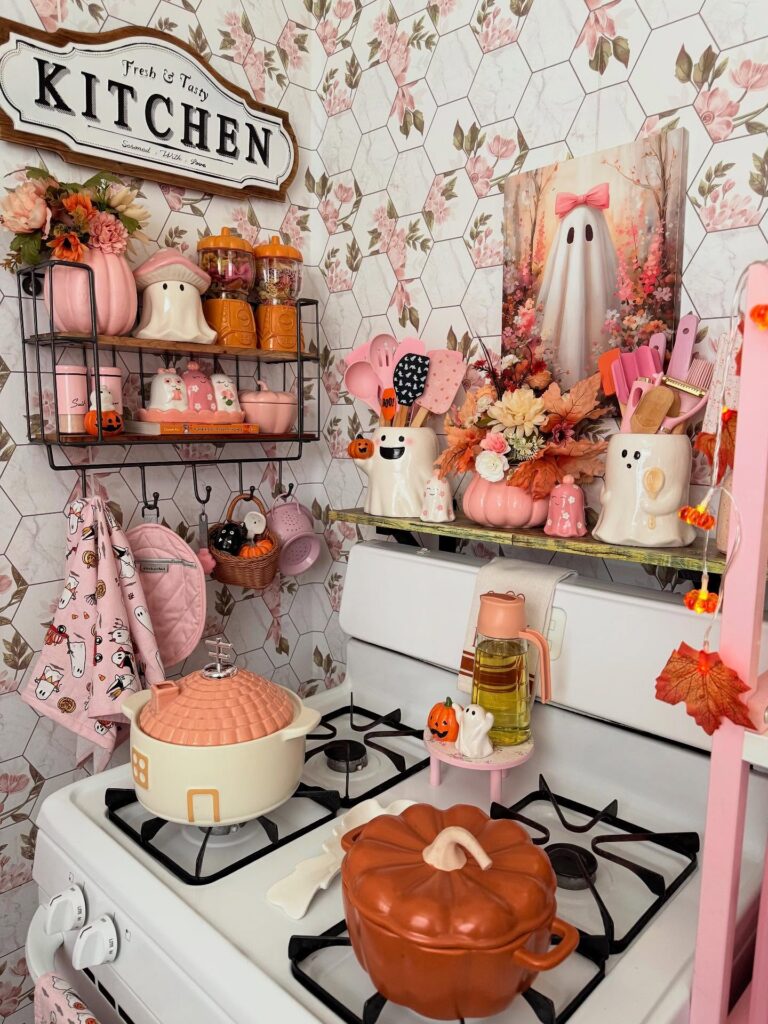
Swapping out your regular utensil crock for a ghost-face ceramic mug is one of those small changes that actually reads well from across the room. The ones in this kitchen are holding pink spatulas and wooden spoons, which sounds chaotic but works because the colors stay in the same orange-pink family throughout the shelf. If you can’t find ghost mugs, a plain white wide-mug with a drawn-on face using a food-safe marker does the same job.
Keep the utensils to three or four — overstuffing it just looks messy. The pumpkin Dutch oven sitting on the stove is doing a lot of heavy lifting here too, and those are easy to find around October at most home goods stores. Worth grabbing one if you cook enough to justify it.
Stacked Board Display
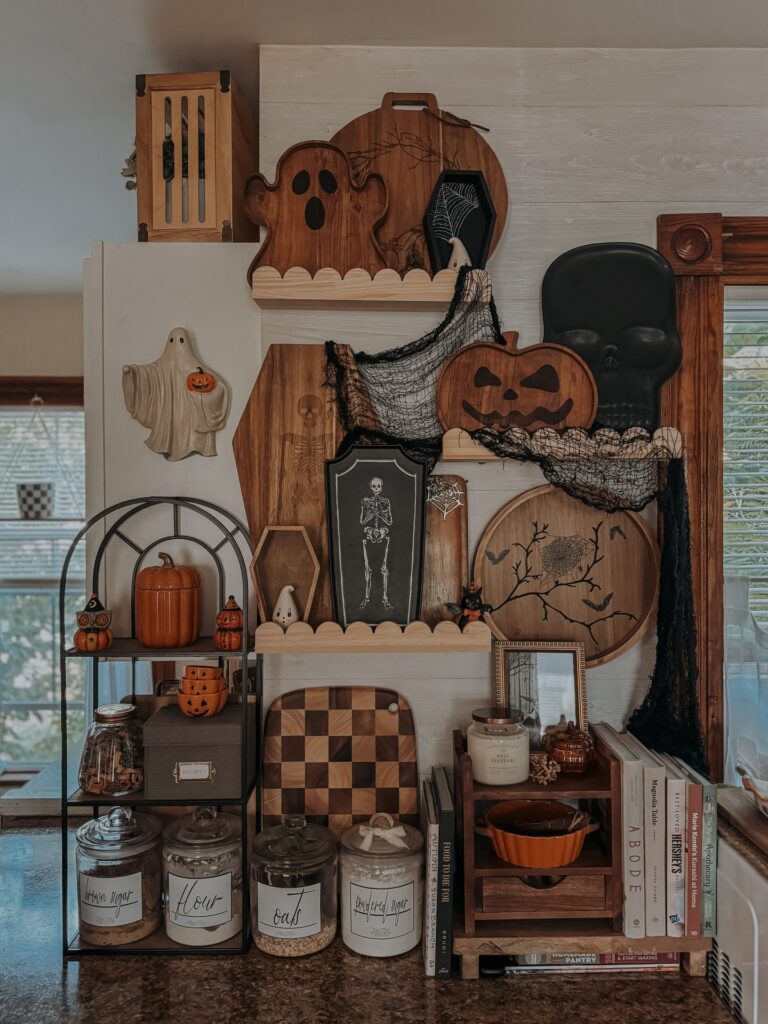
Start with the cutting boards you already leave on the counter, then let the Halloween pieces sit in front of them. Wood does half the job. A ghost, a coffin plaque, or a pumpkin cutout reads better when it has those boards behind it, especially if your kitchen has jars, cookbooks, and little shelves nearby.
Keep it crowded. The trick is height: put the tallest board at the back, a shelf or riser in the middle, and the smaller figures low enough that they do not block everything. I’d skip loose glitter here, because it will end up in the flour jar or near the toaster before the week is over.
Vintage Halloween Characters on Open Shelving
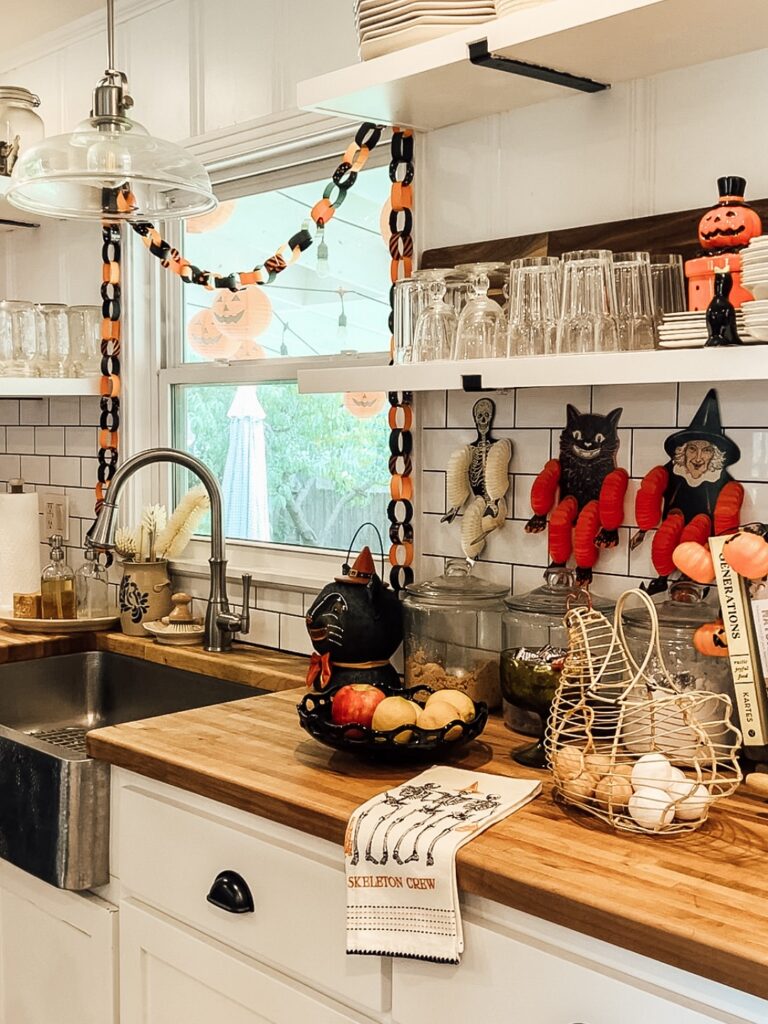
Those jointed paper cutouts — the skeleton, black cat, and witch with the accordion legs — are reproductions of 1950s Beistle decorations. You can find them on Etsy or Amazon for a few dollars each. Prop them against the backsplash on open shelves so they lean between your everyday glassware. The paper chain garland strung across the window pulls the same orange and black into the upper half of the room.
One thing I’d change. The chain hanging directly in front of the faucet looks charming but gets in the way every time you rinse a dish. Loop it higher, or shift it to a window you don’t work under.
The skeleton crew tea towel and the little witch teapot finish it off without needing much else on the counter.
Shelf and mug rail
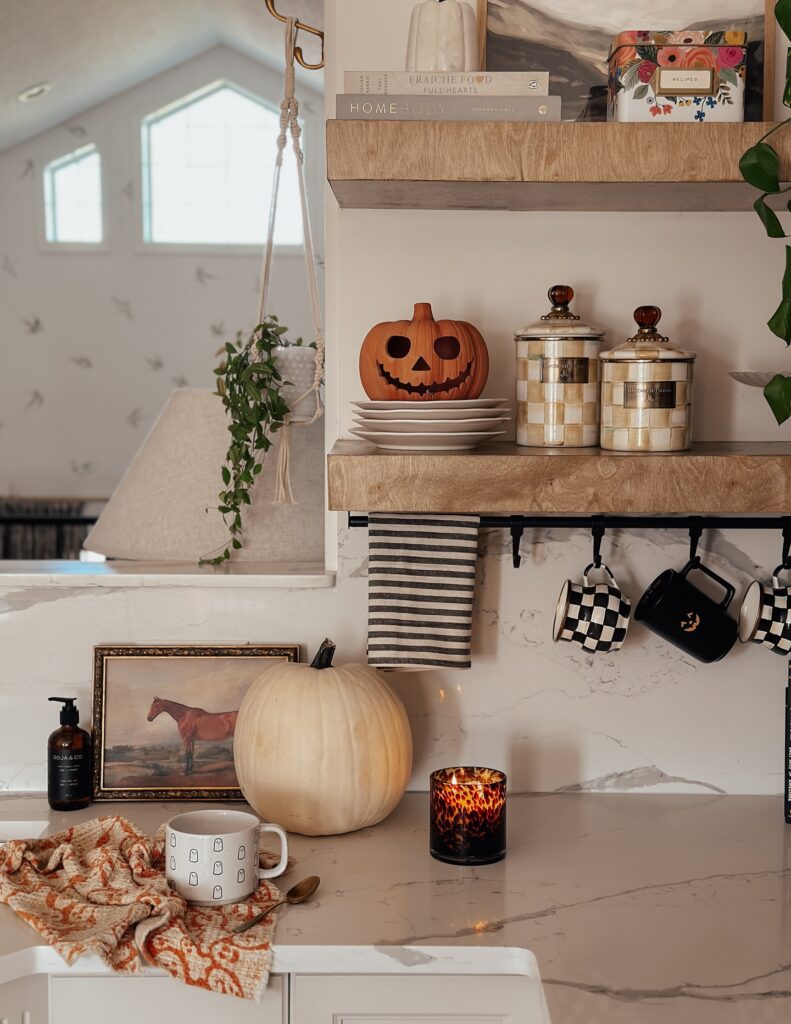
Start with one playful piece. The jack-o’-lantern tucked onto a stack of plain white plates does most of the work here, because it reads Halloween straight away without taking over the whole kitchen.
Then keep the rest in a tight palette. Black, cream, wood, and one soft orange note are enough, especially if you’re already working with open shelves and a mug rail where every little thing stays visible all day.
The check mugs help because they echo the lidded canisters, so nothing feels dropped in at random. A striped hand towel does the same job. Repetition matters here.
If you want this look, shop your everyday pieces first and add just one pumpkin on the counter and one on the shelf. I’d skip anything neon or glittery since it would break the quieter, collected look.
Run a Garland Along the Cabinets
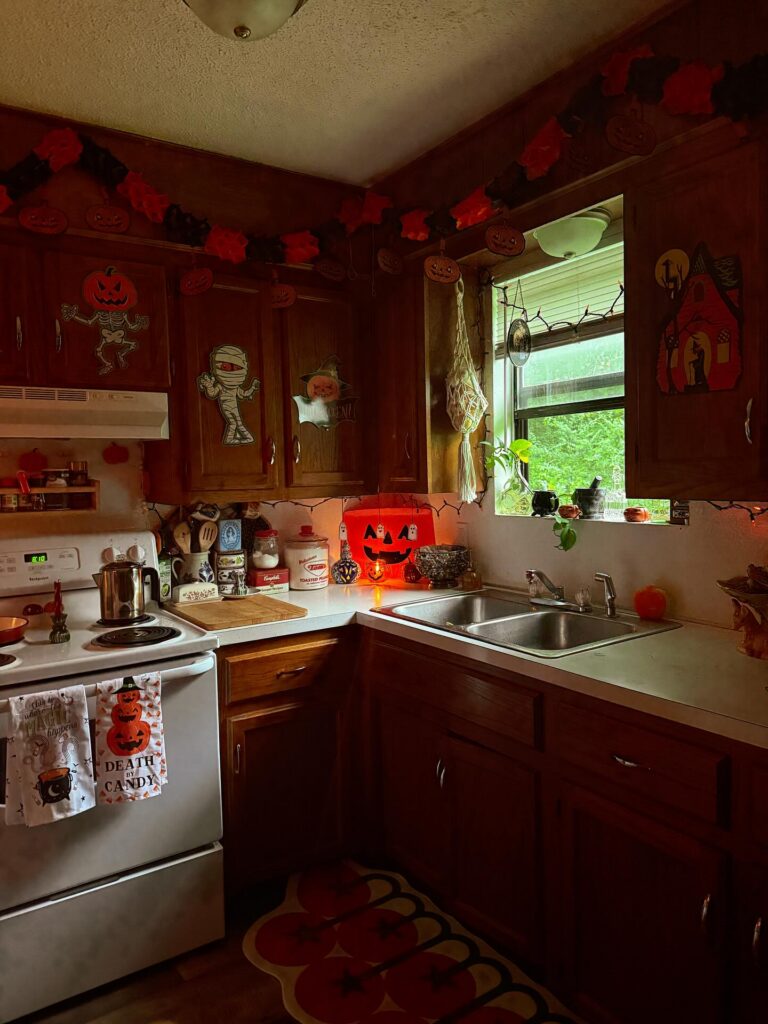
That red and black paper garland along the top of the cabinets does a lot of heavy lifting for minimal effort — it pulls the eye upward and ties every cabinet face into one continuous Halloween moment. You can find these at most craft stores in October, or make one with cardstock cutouts if you have an hour to spare. The flat cabinet cutouts stuck directly onto the doors, the mummy and skeleton ones here, are just tape jobs.
Nothing permanent. If your cabinets are a darker wood like these, orange and red show up much better than purple or green, which can get lost. I’d skip anything too delicate or paper-thin if your kitchen gets steam near the stove — it warps fast.
Bats Across Cabinets
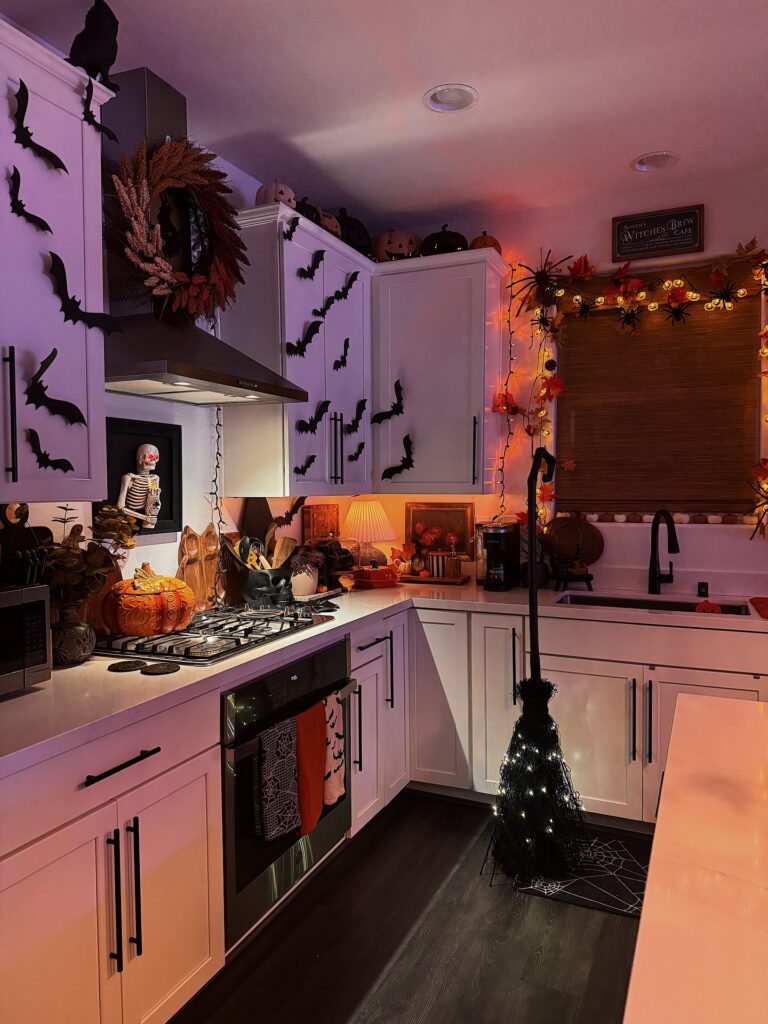
Start with the cabinet doors if you want the Halloween stuff to look spread out without taking over your counters. Stick paper bats in a loose trail across the upper cabinets, then let a few drop lower near the handles so it feels like they are moving through the kitchen. Keep them flat.
The orange string lights around the window do most of the night work here, especially if your cabinets are white and catch every bit of color. I would skip putting bats too close to the cooktop, because steam and grease will make the tape give up faster than you think. A wreath over the hood finishes the top line without needing another pumpkin on the counter.
Ghost Garland Above The Stove
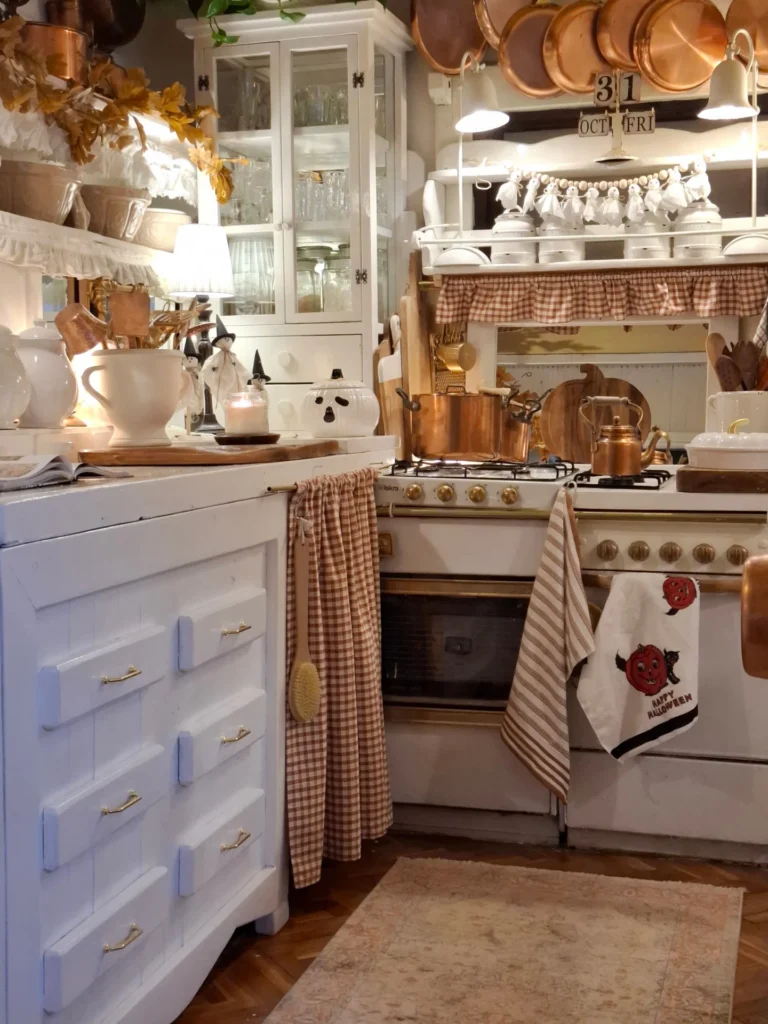
The little fabric ghosts strung along the shelf above the range are the thing to copy here. Cheesecloth over a styrofoam ball, tied at the neck with twine, two dots for eyes. Takes an afternoon.
What makes it work is the placement. High up, above the copper pans and the gingham valance, where you’d normally hang nothing. It reads as Halloween without cluttering the counter you actually cook on.
I’d skip the pumpkin tea towel below though. Too much going on when the garland is already doing the job. Pick one focal point per sightline and let the rest stay quiet.
If you have open shelving or a plate rail, this is the spot. Renters too — no nails, just twine looped around whatever’s already there.
Countertop pumpkin cluster
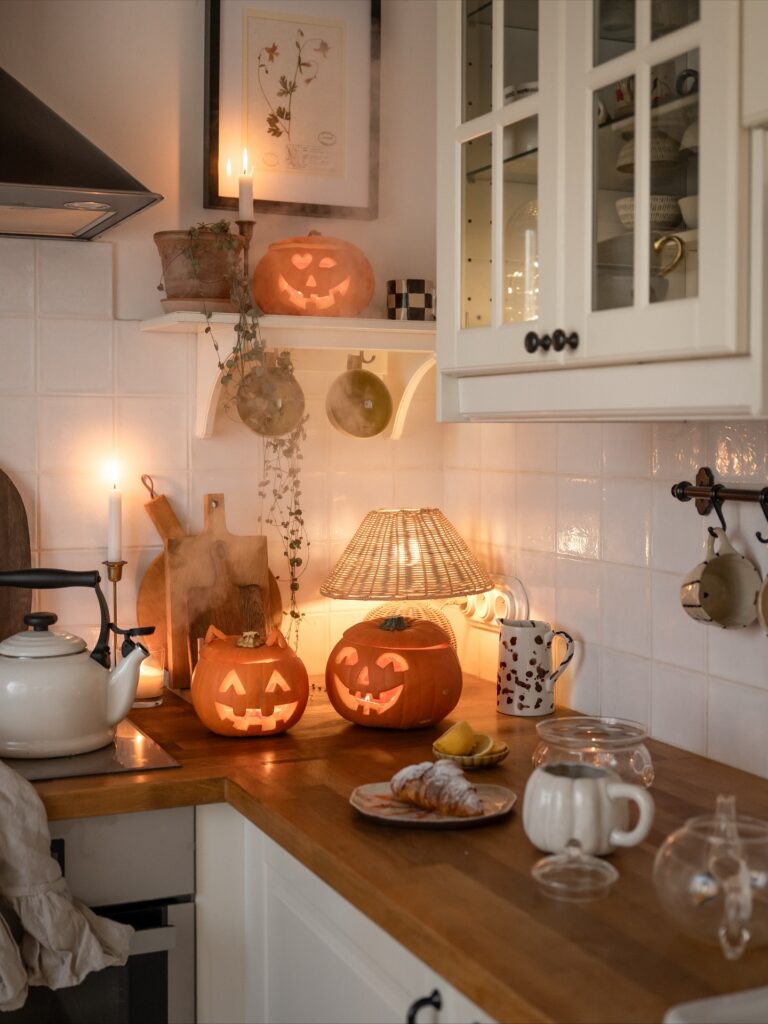
Start with two carved pumpkins on the worktop, not five scattered around the room. Keeping them near the chopping boards and kettle makes the whole setup look tied to the kitchen, and the wood boards behind them stop the orange from looking dropped there at random. Add one more pumpkin higher up on a narrow shelf if you want the display to travel upward a bit.
The lamp matters too. That low woven shade throws a softer pool of light than bright ceiling bulbs, so the carved faces show up without the counter looking harsh.
Candles help. Real or battery.
If you don’t carve, use faux pumpkins and cut only one, then leave the others plain. I’d skip anything glittery here because the cream cabinets, mugs, and white tile already do enough.
Open Shelves Dressed for Fall
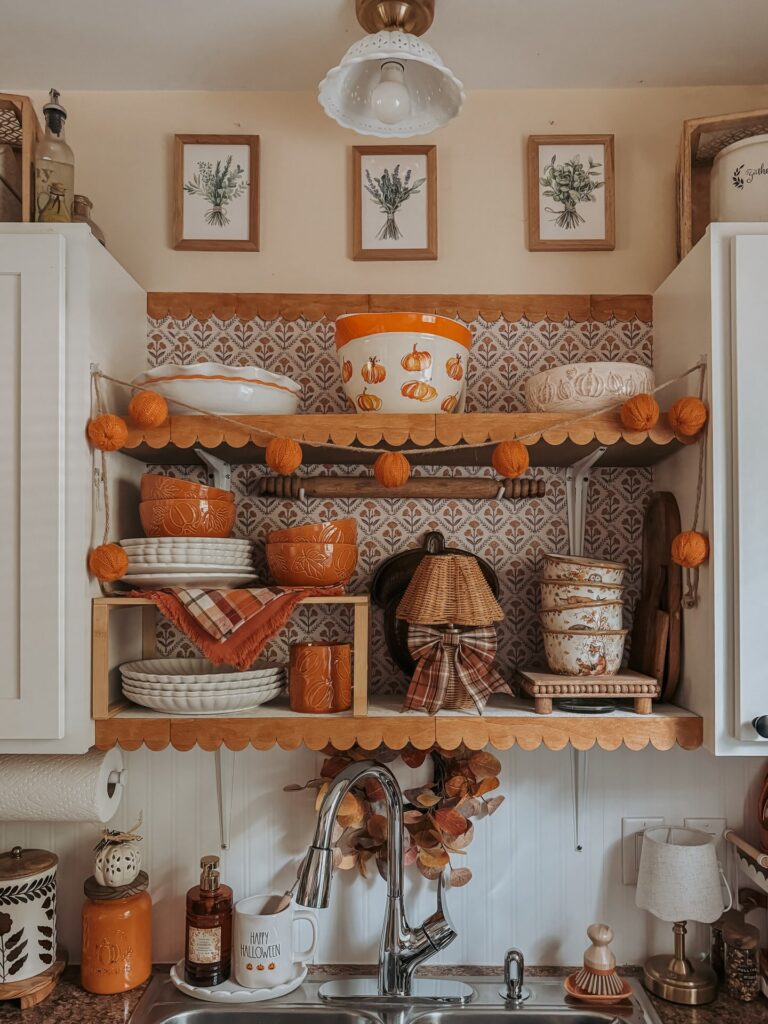
The scalloped shelf edging here is doing a lot of the work before a single pumpkin bowl even enters the picture. Stack white dishes as your base, then layer in orange ceramics — the embossed pumpkin bowls and that big mixing bowl with painted pumpkins give you Halloween without touching a single plastic skeleton. A string of orange yarn balls draped across the front ties the whole shelf together.
Honestly, the patterned backsplash behind it all is a big part of why this reads so well, but removable wallpaper exists and it’s easier than it sounds. The plaid bow on the wicker pumpkin is the kind of detail that takes thirty seconds. Open shelving suits this idea best — if yours has cabinet doors, you’d need to rethink the whole approach.
Shelf With Small Halloween Pieces
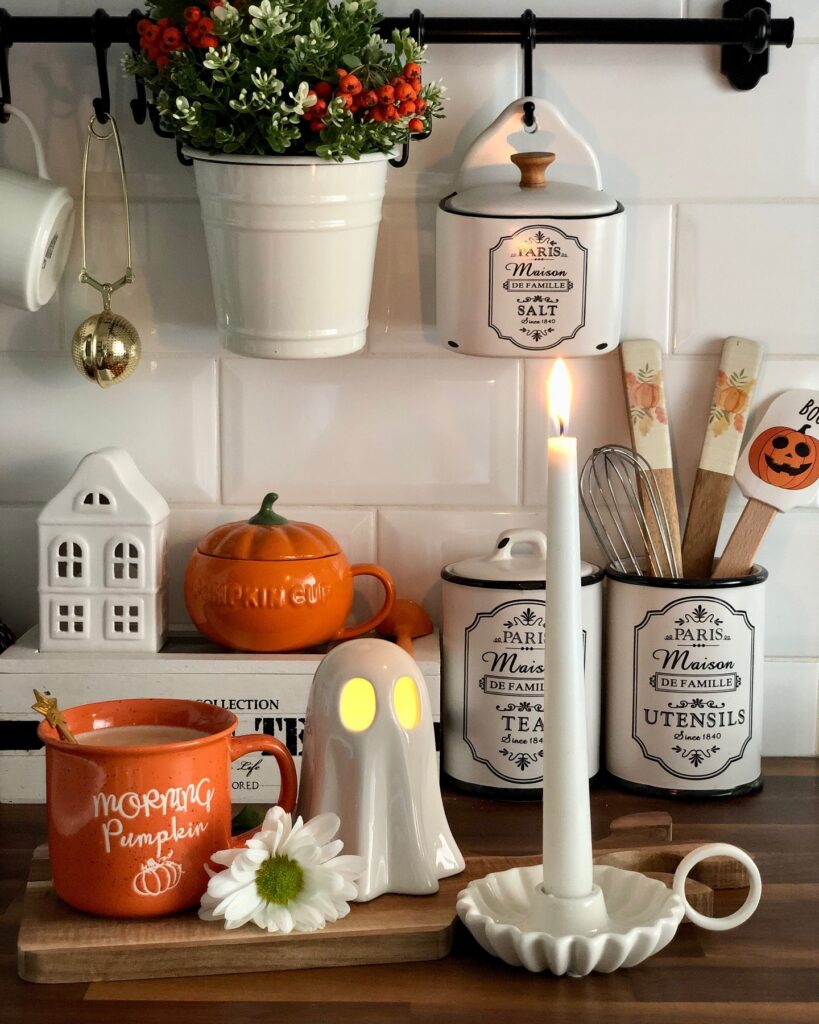
On a kitchen shelf, this works best when the Halloween pieces are mixed into things you already use, like the utensil crock, tea tin, and mugs. Keep it low. A ceramic ghost or pumpkin mug gives enough of a seasonal hint without making the counter hard to clean around, especially if you leave the taller candle toward the side instead of right in the middle.
The black rail above helps too, because hanging one planter or cup keeps the back wall from looking empty. I’d skip too many tiny pumpkins here, since they get annoying fast when you’re wiping crumbs or moving coffee cups around. One or two orange pieces are enough.
Spiders on the Window
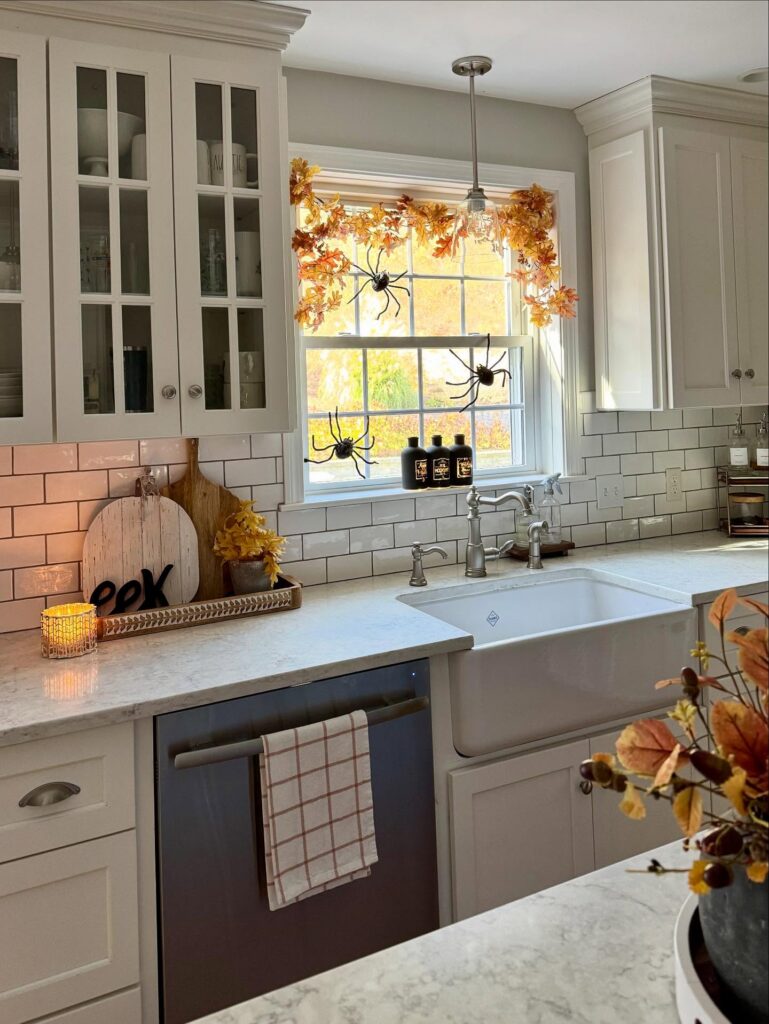
The trick here is the window itself. A leaf garland strung across the top of the frame gives you something to hang spiders from, and the light coming through makes their silhouettes read from across the room. Two spiders is enough. Any more and it starts looking like an infestation rather than a decoration.
If you don’t have a window over your sink, this works on a mirror or even the underside of open shelving. I’d skip the plastic web stuff though — it catches grease near the stove and looks grim by week two. Stick with the garland-and-spider combo. The black soap bottles on the sill pull the same color down to counter level, which is what keeps the spiders from feeling like they’re floating up there on their own.
Bat window over sink
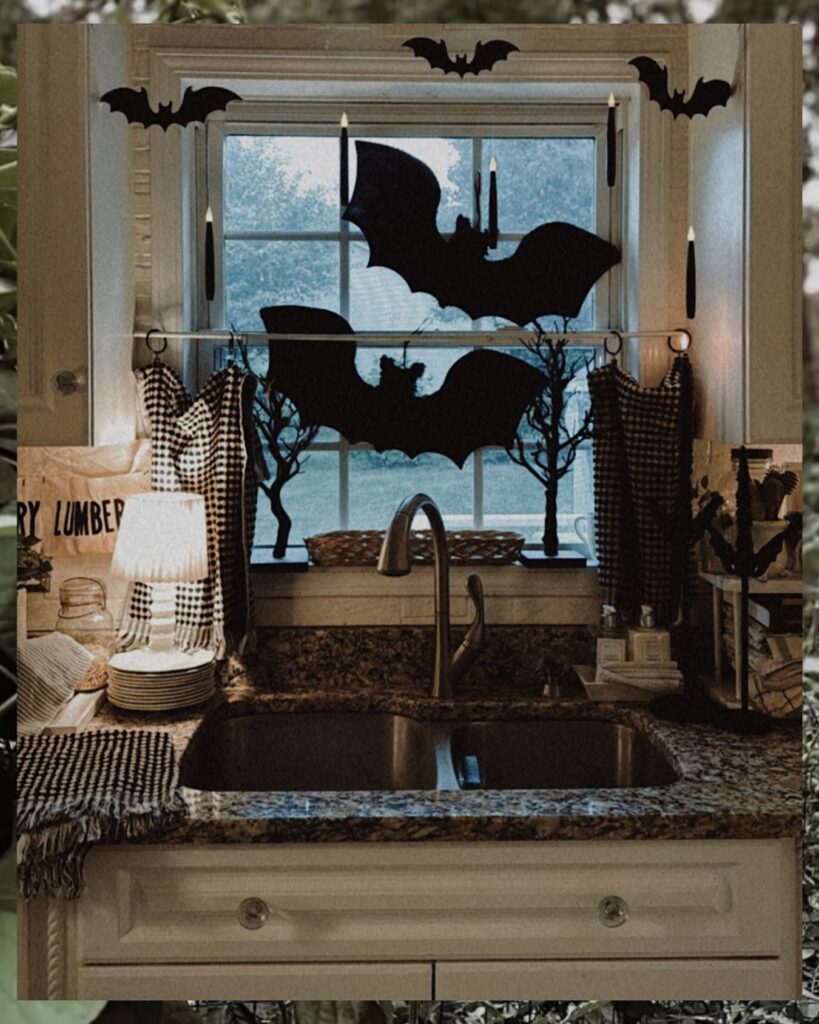
Start with the window, because that’s doing most of the work here. A few oversized black bat cutouts taped to the glass and trim are enough to turn the sink area into a Halloween spot without covering the whole kitchen in themed stuff.
The gingham curtains help more than you’d think, since that small check already has that farmhouse look and gives the black shapes something to sit against instead of floating on plain white. Add two bare branch silhouettes at the bottom if you want the scene to feel finished. Paper or thin plywood both work.
Keep the rest quiet. A dark hand towel, a black candlestick, maybe one amber lamp on the counter. I’d skip anything bright orange here, because the point is that shadowy window scene over the faucet, not a pile of novelty decorations fighting for attention.
Black and White Halloween Shelf Styling
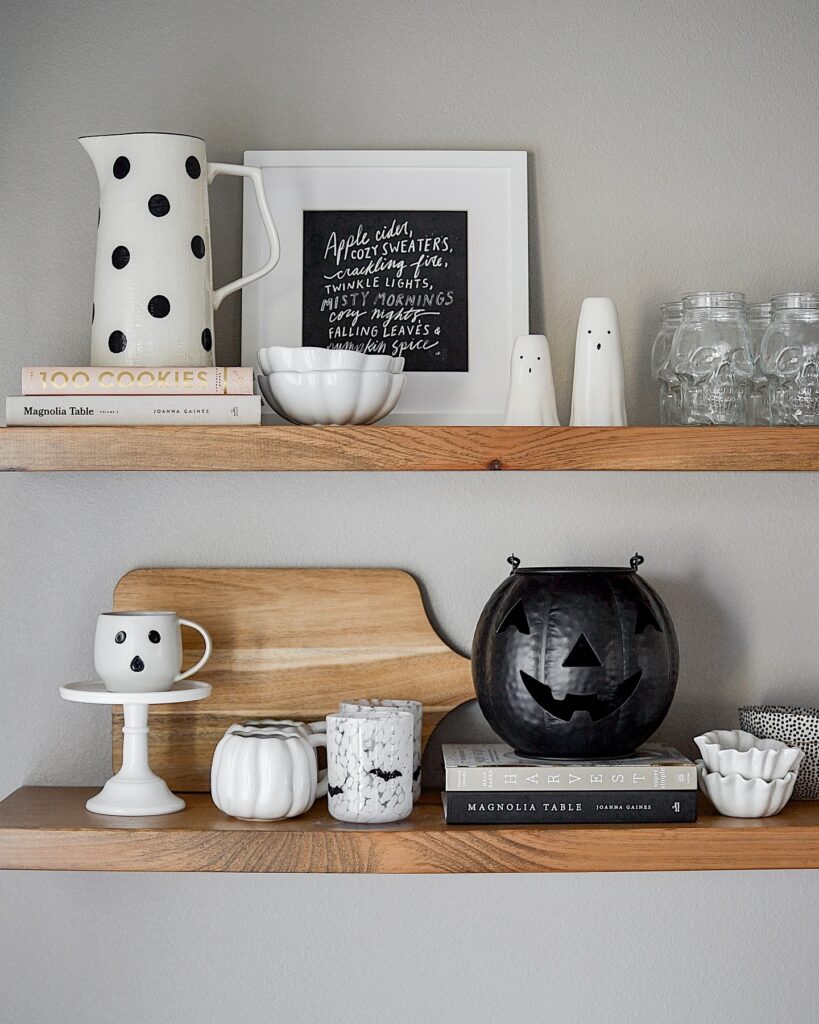
Sticking to two colors makes this much easier than it looks. The black jack-o-lantern lantern sitting on those stacked Magnolia Table books does the heavy lifting — everything else on the shelf is white, so nothing fights for attention. Ghost mugs, pumpkin-shaped bowls, a polka dot pitcher that was probably already in the cabinet.
That’s the whole move: pull existing white kitchen pieces and add one or two black Halloween items. The skull glasses on the top shelf are the only thing I’d personally skip — they lean a bit party-supply — but if you already own them, they fit the palette fine. Works best if your kitchen already runs neutral.
Floating Island Ghosts
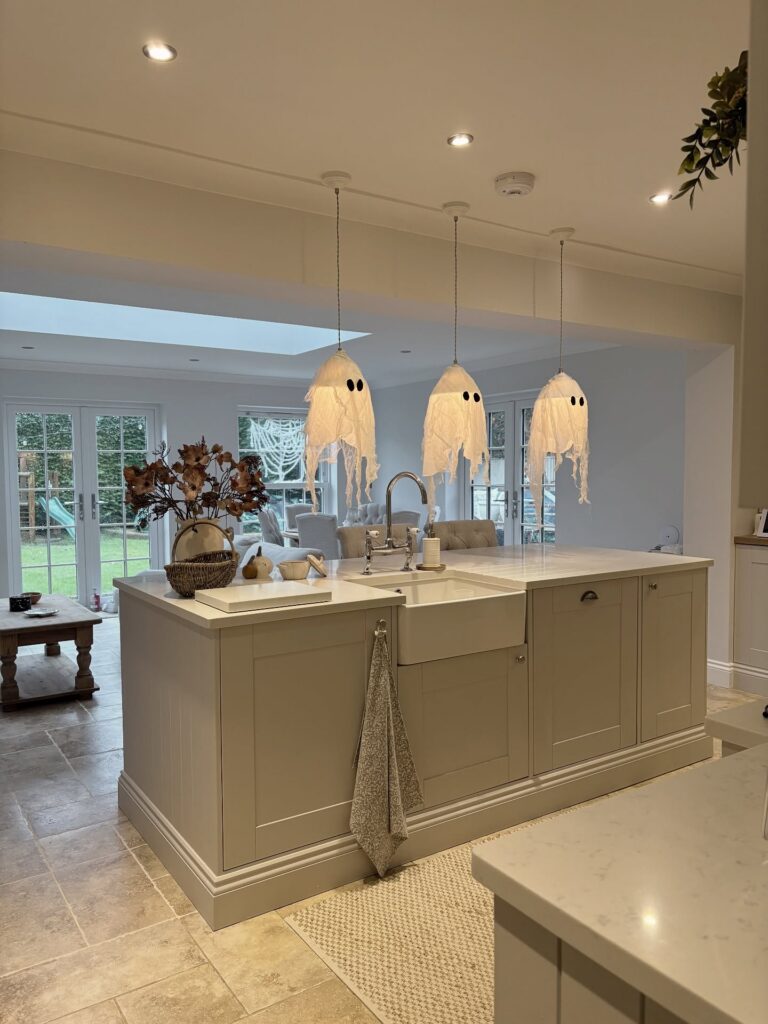
Over the island, the trick is to keep the ghosts hanging at the same height as your usual pendants. Use thin muslin or cheesecloth, cut the bottoms unevenly, then tape two black felt ovals where the bulb shape gives the face a bit of depth. Very little is needed.
If your pendants run hot, do not wrap fabric around them; use LED bulbs, or hang the ghost from the ceiling rose with a small wire hoop so the cloth sits away from the light. I like this most over a long island because three in a row feels planned, not like one random decoration got stuck there.
Go All In
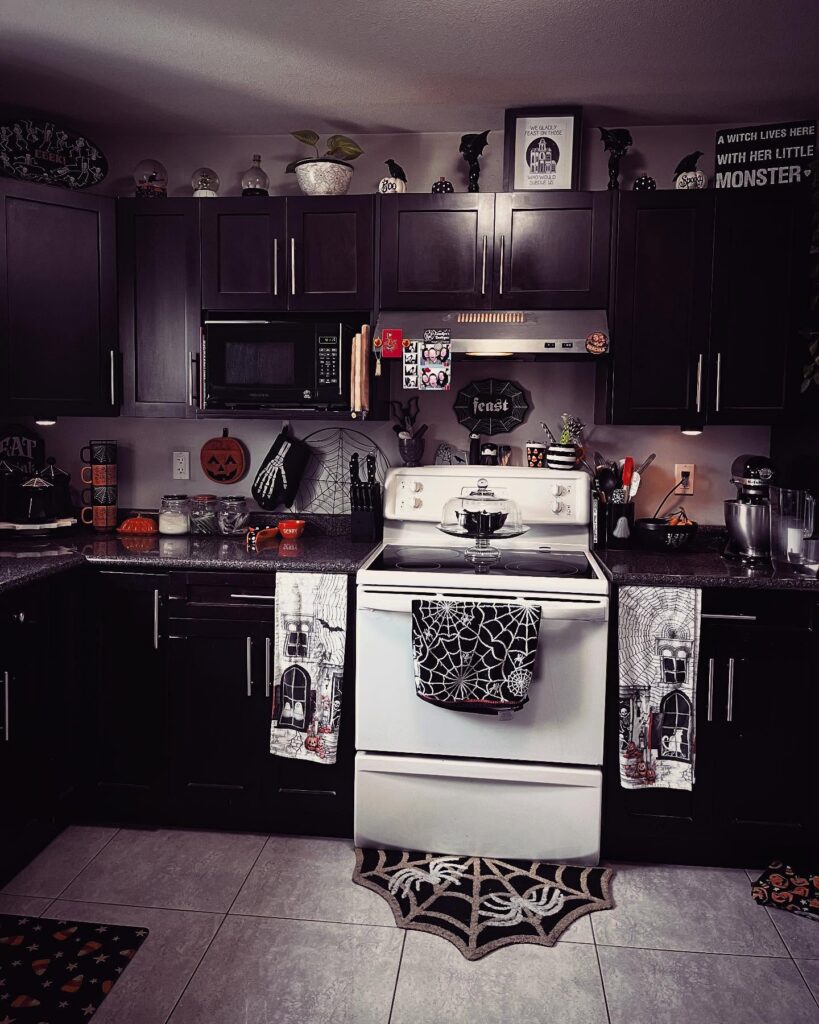
This is the maximalist version. Every surface has something on it — spiderweb tea towels draped over the cabinet doors, a web mat on the floor, the “A Witch Lives Here With Her Little Monster” sign wedged above the cabinets next to snow globes and little black cat figures. The trick to pulling this off without it feeling like a bin exploded is sticking to a palette. Black, white, orange, that’s it. If you look closely everything obeys those three colors, which is why the eye reads it as decorated rather than cluttered.
One thing I’d skip: the stovetop pumpkin under the glass cloche. You need that burner. Move it to the counter and you’ve lost nothing.
Start with the tea towels if you’re testing the waters. Cheapest entry point.